Friday 9 March 2018

Dreaming of Dresses: Juniper Cardi Pattern Review


On this icy cold and snowy "spring" day, I bring you what I think will become a wardrobe workhorse once the weather gets a bit milder. Let me introduce: the Juniper Cardi by Jennifer Lauren Handmade.


My summer and winter wardrobes are far from identical. In the summer period, I wear 50's style summer dresses whenever I can, with the occasional tunics and leggings for more practical wear. In the autumn, winter and most of the spring, however, I almost exclusively wear skirts in 40's, 60's and 70's styles with different sweaters and blouses.

By this point, I am sick of all my skirt options. Pants are non-negotiable. I LOOOONG to wear my pretty, pretty dresses, and that means cardis. Lots and lots of cardis. In the spring and autumn, they provide warmth and in the height of summer, they provide protection from the sun.


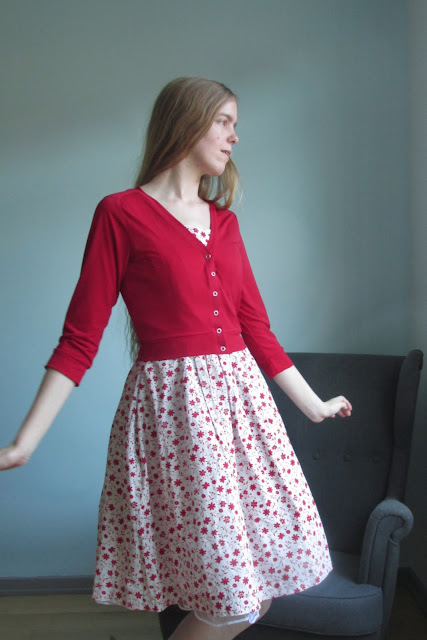
The Juniper Cardi is a classic cardi but with a fun saddle back shoulder detail. It comes in both a cropped and a longline version and with several sleeve options.

For my first go, I made the cropped version with 3/4 length sleeves, as this is my favourite length to wear with my dresses. I am between a size 10 and 12 in the size chart, but went down to a straight size 10, and could perhaps have gone even further down or sewn the side seams with a slightly bigger seam allowance for a more fitted look.

I sewed the cardigan in a beautiful "Ritual" jersey from John Kaldor via Minerva Crafts. It is a poly/spandex blend and has a good drape. Almost too good, actually, as it is a bit thin and flimsy to work with. This stuff is not for beginners!

The construction is very simple, but still interesting due to the saddle shoulder. With a bit of careful pinning, going slow on the overlocker and some clever nothes on the pattern it, went together beautifully ;)

I did have problems with my buttonholes, so I took it as a sign to try out some press studs instead. These are from Stof&Stil.


All in all, this will be a great little layering cardi. I would change the fabric type for next time to beef it up a bit, but in this weight it will be perfect for summer here in Denmark.However, the length is perfect for my full dresses and skirts and I love all the little details. I might sew up an entire rainbow of these :)
I have also seen some cute colorblocked cardis with a similar sleeve in Hogwarts House colors that would be fun to recreate! Should I go with Rawenclaw or Gryffindoor?


Disclaimer: I did receive this pattern for free in exchange for an honest review. All thoughts and opinions are my own.

Saturday 6 January 2018

2018 Re-Sew-Lutions

Happy New Year, Dear Reader!

New Year is a time to reflect on the passing year and looking a head to the new year, setting up goals and resolution. On wednesday, I showed you my Make Nine collages for 2017 and 2018. Today, I am back with my Re-Sew-Lutions for the new year.

I am not good at keeping up with challenges that require you to make something on a monthly basis to fit a particular prompt. Therefore, I will not try to participate in the Historical Sew Monthly or the Sew My Style challenges this year, but have set some more universal reSEWlutions.

So, without further ado, I'd like to present my reSEWlutions for the coming year:


1) No Buying RTW Clothing! Sew All The Things!

I have joined Sarah Gunn of Goodbye Valentino and about 1000 other sewists for the 2018 RTW fast and mean to keep to it. It is a sewing community set up to support each other in sewing your own clothes instead of buying RTW, pushing yourself to learn new techniques on the way and to save money.


2) Sew With What I Have!

The stash-downsizing is not going too well. Since September, I have added about 50 meters of fabric from various sources and have only sewn about 40. As a result, I now have more fabric than when I started, about 410 meters. 110 meters to go before September 1st!

I will not but a direct ban on myself, but I will be more conscious about what I add and perhaps spend my fabric-money on patterns, better notions and tools instead. Also, I will clean out my stash around Easter, when my sewing room gets a fresh paint-job.


3) Sew More For My Boyfriend!

Like so many other seamstresses, I am notoriously bad at sewing for my significant other. Inspired by the Love To Sew podcast episode where Caroline and Helen interviewed their husbands, I am in the process of sewing my boyfriend a pair of True Bias Men's Hudson Pants and hope to follow up with a few sweaters, hoodies, boxers, chinos and dress shirts.


And that's it for my resewlutions! I hope you have had a nice start to your 2018. I will be back shortly with another make. In closing, here is my #2017BestNine from Instagram:


Wednesday 3 January 2018

Make Nine


Happy New Year, Dear Reader!

New Year is a time to reflect on the passing year and looking a head to the new year, setting up goals and resolution.

Today, I will start by looking back on 2017 and then ahead to 2018 in the form of the Make Nine Challenge. This is a "gentle challenge" for makers created by Rochelle of Lucky Lucille, now Home Row Fiber Co. You choose 9 patterns that you haven't made before to try and make throughout the year.


As shown above, only 2 of the nine patterns from 2017 were sewn up. You can see the Zinnia skirt here and the Elmira cardigan here.

The corset and 18th century dress were postponed, as my historical events got cancelled.
The vintage shirt dress and the Mimi blouse got postponed due to the fabric being missing after our move last year.
The bras and the backpack were postponed due to the number and cost of the specialty materials.


For the 2018 Make Nine, I have chosen these 9 patterns:

- B6031 - Gertie for Butterick.
- B6380 - Gertie for Butterick
- The Boylston Bra - Orange Lingerie - Carried over from last year.
- B6217 - Gertie for Butterick.
- The Lamour Dress - Gertie for Charm Patterns.
- New Look 6107
- The Rosie Dress - Sew Over It
- A Pencil Skirt - Pattern TBA
- The Vintage Shirt Dress - Sew Over It - Carried over from last year.

I hope to do a little better this year, making more that 2 of these patterns. So far, I have written them all into my excel planning sheet and packed some of the fabrics for a post-exams sewing holiday in late January. Wish me luck!

Are you participationg in the #2018MakeNine?

Monday 18 December 2017

Winter Roses


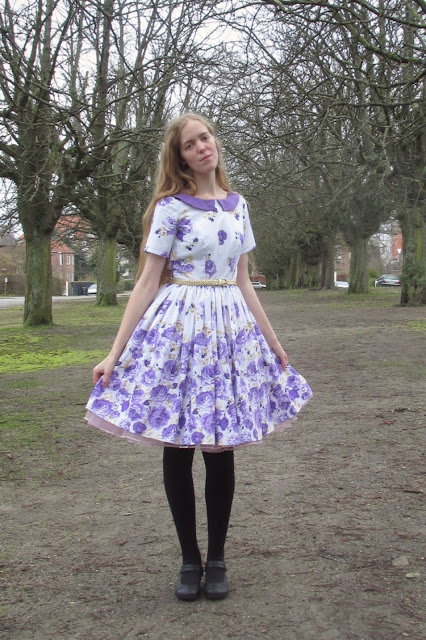
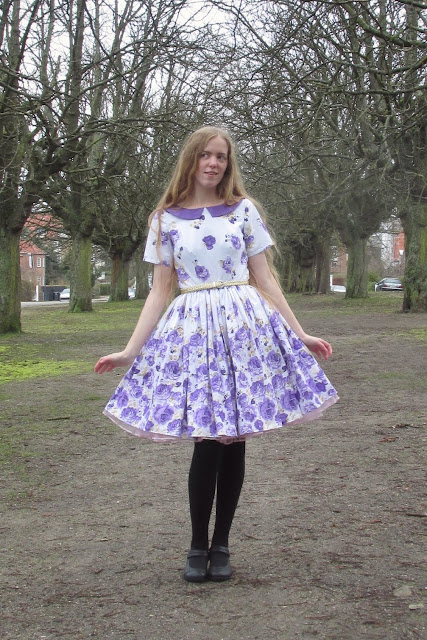
Let me start by saying - this dress has been a long time coming! The fabric was bought during our trip to London in 2015 with this particular project in mind. Then, the first muslin was made back in March 2016 and the fabric was cut out last winter. The dress was mostly constructed back in February and March of this year and was then halted because I needed a different purple fabric for the collar.

This is, of course, the Emery Dress by Christine Haynes, the quintessential classic late-50's-early-60's dress and the ultimate blank canvas pattern to use with crazy printed fabric. I fell in love with this pattern when I saw some beautiful versions online, this and this in particular.


Now, everybody has had rave reviews of this pattern and the miraculous fit straight out of the envelope. For me, this was only the case with the back piece, which to be fair might also just be the best fitting back piece I've ever sewed.
For the rest of the dress, I have so far gone through 4 muslins of the bodice and 5 of the sleeves, whereof the last 3 sleeve versions have been self-drafted. I think the bodice fit is on point by now, but I might never be truly happy with the sleeves.


My struggle with fit is in no way the patterns fault, but instead a consequence of my weird "body quirk" combination:

- narrow shoulder
- sloping shoulder
- forward thrust/rotated shoulder
- hollow chest
- small bust
- round back
- protruding shoulder blades

Notice how these all affect my back, shoulder, and chest. Together, they make it almost impossible for me to be comfortable in woven sleeves without the addition of gathers or pleats. Add to the list, that my arms are super skinny and anything with a bit of ease around the bicep makes my arms look almost sickly thin.


Well, enough about the fit. This dress was always meant to be a "wearable muslin" for the bodice and sleeves. and by that it has met its purpose and I will still wear the dress occasionally.

The fabric was, as previously mentioned, bought during our trip to London in 2015. I got is from a shop on the shopping street in Walthamstow. The fabric was sold as a cotton bedding fabric and was 220 cm wide with the beautiful rose borders on both selvages. I got 1,5 meters for about 4 £.


I used both of the borders for the skirt and cut the bodice and sleeve pieces from the middle part of the fabric. I had to compromise a bit on the skirt length in order to allow enough fabric for the bodice pieces, and the skirt is a smidge too short because of it. For reference, my pink petticoat (24") shows a bit of petticoat at the hem, as shown in these pictures, and my black petticoat (20") gives a bit of a lampshade effect at the bottom. It seems like I need a 22'' petticoat in lilac or perhaps sew a little purple ruffle on the hem ;)

The bodice is interlined in a white cotton batiste, as the bedding fabric is a bit sheer. The pink petticoat shows a bit through the skirt, but it is not too noticeable thank to the gathers.

All in all, I have mixed feelings about this dress. I love the fabric and the bodice fit, but I feel like the sleeves are a bit too restricting for it to be comfortable. I prefer to wear sleeveless dresses and layer them with cardigans when I need the warmth and coverage of sleeves. I will modify the bodice to be sleeveless and report back soon!

If, by chance, you know a magic fix to my sleeve fitting problems, PLEASE let me know!

Yours,
Angelica


Tuesday 12 December 2017

Pretty Potholders [Archive Post]


This is the first of a new blog series that I'd like to call "Archive Posts". I have a few things and pieces that never got blogged due to my long blogging hiatus, and this is my way of finally getting them here.

Today, I'll show you these lovely potholders & matching kitchen accessories I made for my boyfriend's mom 3 years ago as a Christmas gift. I am currently in the process of making her a new Christmas-themed set, as these potholders got badly burned on her stove after just 3 weeks in service. She still has the tea towel and tea pot cozy, though.


All materials and patterns came from Stof&Stil. The pattern is 90197, a kitchen essentials set including 2 styles of potholders, a bread basket and a tea pot cozy. I changed the pattern a bit by eliminating all the patch-work and by changing the shape of the potholders to have a round top, as I wanted a more traditional look with a fabric strap instead of the curtain rings. I did not make the long potholder (yet!) or the bread basket.

The main fabric of the set is a heavy weight linen-look cotton fabric with a traditional fluted design printed in dark grey. A coordinating heavy dark grey yarn-dyed cotton, some darker grey bias binding and a few scraps of natural colored linen completed the fabric palette.


Thermal isolation interlining is recommended for the potholders and I went a step up and added 2 layers of interlining on the hand palm side (the big layer) and 1 layer on the back hand side (the partial layer) of each potholder.

The interlining was quilted to the fabric, but the 2 layers of interlining made it too thick to quilt in one go, so for the hand palm side, the inner and outer fabric layer was quilted separately to 1 layer of interlining. This also made it possible to have separate quilt designs for each print/color, so that the plain grey is quilted in a diamond pattern and the print fabric is quilted along the grey lines in the fabric.
For the partial back hand part, a fabric-interlining-fabric quilt sandwich was quilted to the outer fabric design.

The partial layer was bound in grey or linen bias tape and all outer edges was bound in the grey bias binding, first by machine and then with hand sewn top stitching in linen thread and grey yarn over the machine stitching as an extra hand-made touch.


The tea pot cozy was sewn in the grey cotton quilted with 1 layer of thermal isolation interlining in a diamond pattern, lined in a thin layer of soft linen and bound in the dark grey bias tape. It was decorated with a band of print fabric bordered by more bias tape and hand-sewn linen top stitching. 


The tea towel is just a 45*60 cm rectangle of the print fabric with narrow double turned hems and a bias binding loop for hanging. I mitered the corners for a nice finish.

All in all, it was a lovely gift for my boyfriend's mom. The print was very much to her style and the dark grey color is very understated and trendy. The most time-consuming step was the quilting, and such small pieces didn't actually take very long time to quilt.

I hope I have inspired you to make a pair of kitchen accessories for yourself or someone you love.

Do you sew Christmas gifts?

/Angelica