Monday, 18 December 2017

Winter Roses


Let me start by saying - this dress has been a long time coming! The fabric was bought during our trip to London in 2015 with this particular project in mind. Then, the first muslin was made back in March 2016 and the fabric was cut out last winter. The dress was mostly constructed back in February and March of this year and was then halted because I needed a different purple fabric for the collar.

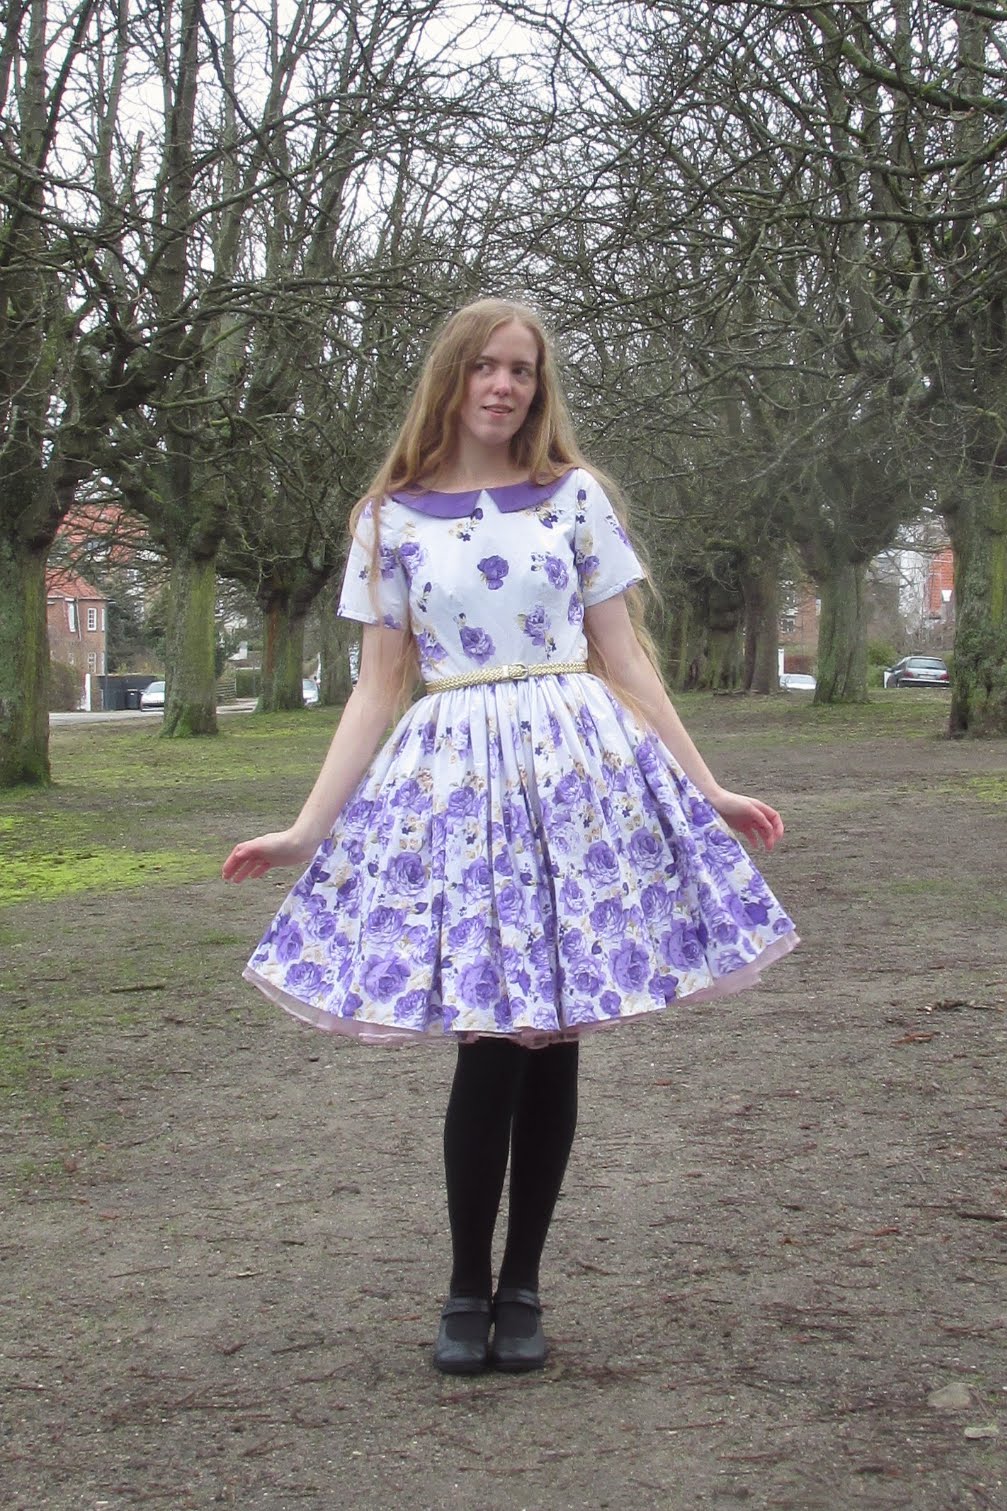
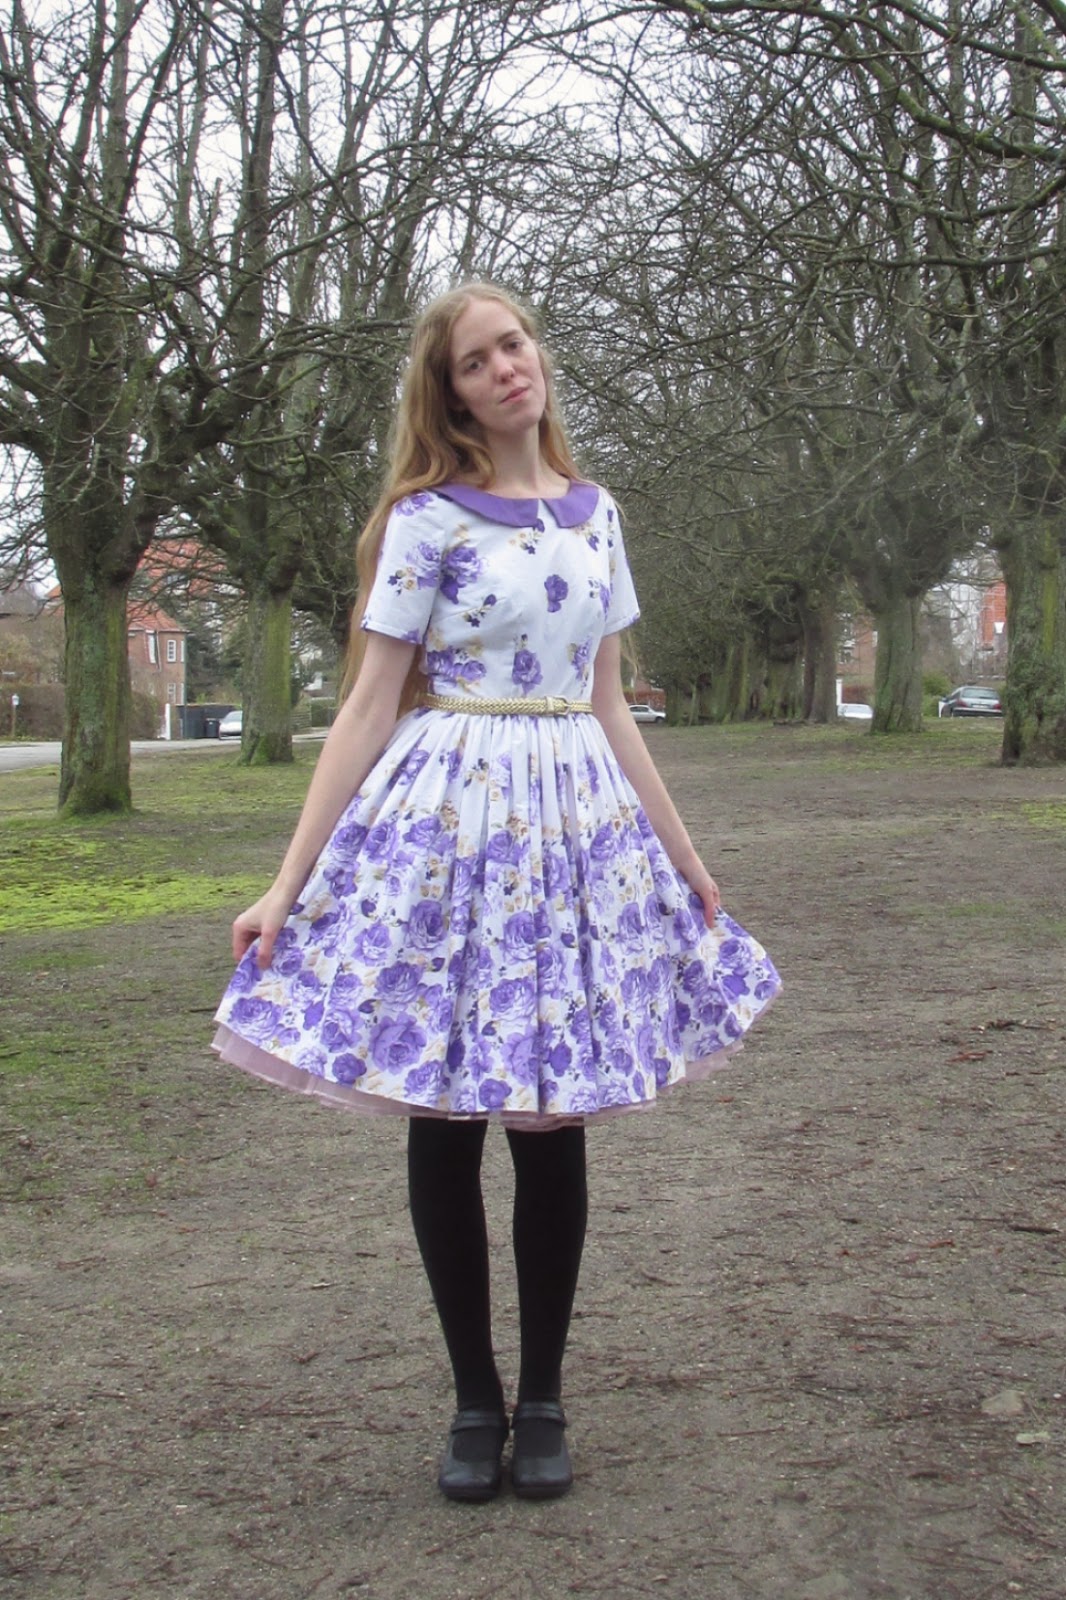
This is, of course, the Emery Dress by Christine Haynes, the quintessential classic late-50's-early-60's dress and the ultimate blank canvas pattern to use with crazy printed fabric. I fell in love with this pattern when I saw some beautiful versions online, this and this in particular.


Now, everybody has had rave reviews of this pattern and the miraculous fit straight out of the envelope. For me, this was only the case with the back piece, which to be fair might also just be the best fitting back piece I've ever sewed.
For the rest of the dress, I have so far gone through 4 muslins of the bodice and 5 of the sleeves, whereof the last 3 sleeve versions have been self-drafted. I think the bodice fit is on point by now, but I might never be truly happy with the sleeves.


My struggle with fit is in no way the patterns fault, but instead a consequence of my weird "body quirk" combination:

- narrow shoulder
- sloping shoulder
- forward thrust/rotated shoulder
- hollow chest
- small bust
- round back
- protruding shoulder blades

Notice how these all affect my back, shoulder, and chest. Together, they make it almost impossible for me to be comfortable in woven sleeves without the addition of gathers or pleats. Add to the list, that my arms are super skinny and anything with a bit of ease around the bicep makes my arms look almost sickly thin.


Well, enough about the fit. This dress was always meant to be a "wearable muslin" for the bodice and sleeves. and by that it has met its purpose and I will still wear the dress occasionally.

The fabric was, as previously mentioned, bought during our trip to London in 2015. I got is from a shop on the shopping street in Walthamstow. The fabric was sold as a cotton bedding fabric and was 220 cm wide with the beautiful rose borders on both selvages. I got 1,5 meters for about 4 £.


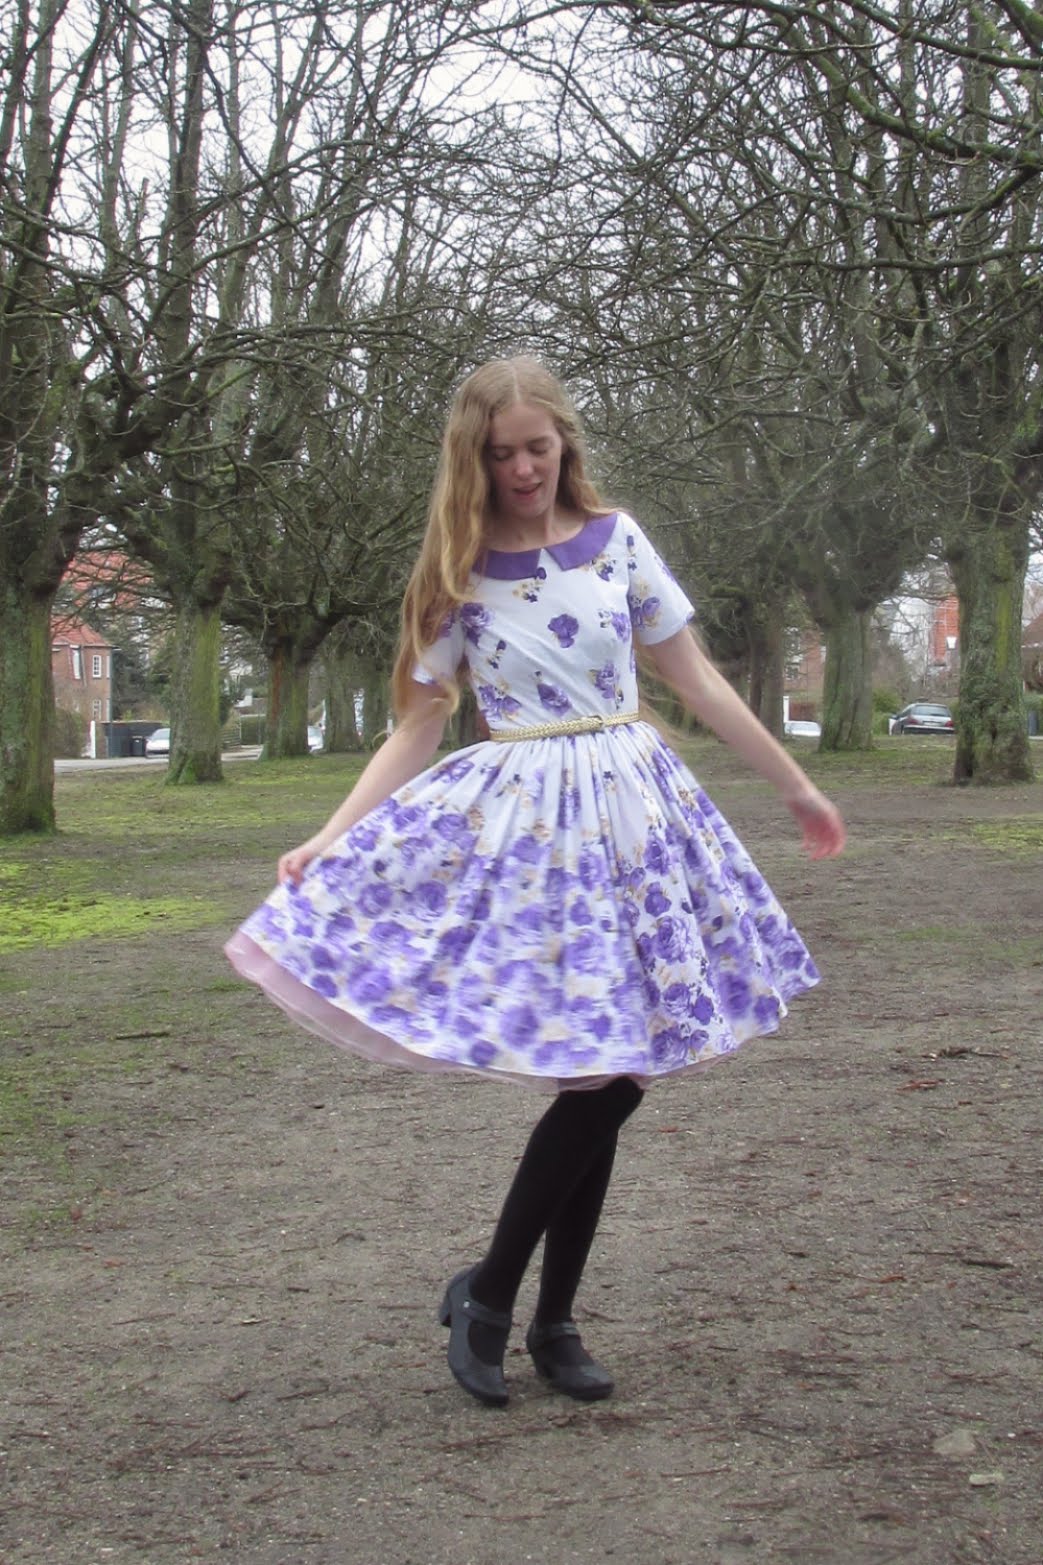
I used both of the borders for the skirt and cut the bodice and sleeve pieces from the middle part of the fabric. I had to compromise a bit on the skirt length in order to allow enough fabric for the bodice pieces, and the skirt is a smidge too short because of it. For reference, my pink petticoat (24") shows a bit of petticoat at the hem, as shown in these pictures, and my black petticoat (20") gives a bit of a lampshade effect at the bottom. It seems like I need a 22'' petticoat in lilac or perhaps sew a little purple ruffle on the hem ;)

The bodice is interlined in a white cotton batiste, as the bedding fabric is a bit sheer. The pink petticoat shows a bit through the skirt, but it is not too noticeable thank to the gathers.

All in all, I have mixed feelings about this dress. I love the fabric and the bodice fit, but I feel like the sleeves are a bit too restricting for it to be comfortable. I prefer to wear sleeveless dresses and layer them with cardigans when I need the warmth and coverage of sleeves. I will modify the bodice to be sleeveless and report back soon!

If, by chance, you know a magic fix to my sleeve fitting problems, PLEASE let me know!

Yours,
Angelica


Tuesday, 12 December 2017

Pretty Potholders [Archive Post]


This is the first of a new blog series that I'd like to call "Archive Posts". I have a few things and pieces that never got blogged due to my long blogging hiatus, and this is my way of finally getting them here.

Today, I'll show you these lovely potholders & matching kitchen accessories I made for my boyfriend's mom 3 years ago as a Christmas gift. I am currently in the process of making her a new Christmas-themed set, as these potholders got badly burned on her stove after just 3 weeks in service. She still has the tea towel and tea pot cozy, though.


All materials and patterns came from Stof&Stil. The pattern is 90197, a kitchen essentials set including 2 styles of potholders, a bread basket and a tea pot cozy. I changed the pattern a bit by eliminating all the patch-work and by changing the shape of the potholders to have a round top, as I wanted a more traditional look with a fabric strap instead of the curtain rings. I did not make the long potholder (yet!) or the bread basket.

The main fabric of the set is a heavy weight linen-look cotton fabric with a traditional fluted design printed in dark grey. A coordinating heavy dark grey yarn-dyed cotton, some darker grey bias binding and a few scraps of natural colored linen completed the fabric palette.


Thermal isolation interlining is recommended for the potholders and I went a step up and added 2 layers of interlining on the hand palm side (the big layer) and 1 layer on the back hand side (the partial layer) of each potholder.

The interlining was quilted to the fabric, but the 2 layers of interlining made it too thick to quilt in one go, so for the hand palm side, the inner and outer fabric layer was quilted separately to 1 layer of interlining. This also made it possible to have separate quilt designs for each print/color, so that the plain grey is quilted in a diamond pattern and the print fabric is quilted along the grey lines in the fabric.
For the partial back hand part, a fabric-interlining-fabric quilt sandwich was quilted to the outer fabric design.

The partial layer was bound in grey or linen bias tape and all outer edges was bound in the grey bias binding, first by machine and then with hand sewn top stitching in linen thread and grey yarn over the machine stitching as an extra hand-made touch.


The tea pot cozy was sewn in the grey cotton quilted with 1 layer of thermal isolation interlining in a diamond pattern, lined in a thin layer of soft linen and bound in the dark grey bias tape. It was decorated with a band of print fabric bordered by more bias tape and hand-sewn linen top stitching. 


The tea towel is just a 45*60 cm rectangle of the print fabric with narrow double turned hems and a bias binding loop for hanging. I mitered the corners for a nice finish.

All in all, it was a lovely gift for my boyfriend's mom. The print was very much to her style and the dark grey color is very understated and trendy. The most time-consuming step was the quilting, and such small pieces didn't actually take very long time to quilt.

I hope I have inspired you to make a pair of kitchen accessories for yourself or someone you love.

Do you sew Christmas gifts?

/Angelica


Friday, 1 December 2017

Holiday Hostess - Minerva Crafts Blog Post


Hi again, I'm back today to tell you that my 3rd project for the Minerva Craft blog just went live! Read it here!

This dress is the ultimate combination of my love of cute vintage dresses and my love of Christmas. I LOOOOVE Christmas and always have. I love the food, the treats, the music and of course spending time with friends and family. Christmas for me is the essence of what we in Denmark call "hygge".

For my fabric, I choose 3 meters of this fun and festive polycotton with red and silver baubles on a navy blue background to make a fun and festive holiday dress. I underlined the dress in brushed cotton and it feels very luxurious next to the skin. I have a mini tutorial for doing the underlining in the Minerva blog post, so head on over there for that or see my Giga Gingham dress - the technique is the same, it's just a bit more thoroughly explained in the Minerva post ;)

The pattern is the boatneck bodice from Gerties Ultimate Dress Book with a gathered dirndl and a hem ruffle (It is a current obsession - see my Halloween skirt). I also added some red piping to highlight the design lines.

A big thank you to Minerva Crafts for sponsoring the materials for this dress, I cannot wait to wear it for dancing around the Christmas Tree on the 24th!

/Angelica